
Weak airflow from your AC is more than an annoyance — it means your system is working harder than it should, your energy bills are climbing, and certain rooms never quite reach the temperature on the thermostat. The cause is almost always one of a handful of well-known culprits, and most of them you can tackle yourself in under an hour.
This guide walks you through 7 proven diagnostic steps in order of likelihood and ease — so you fix it fast without wasting time or money.
Why Weak AC Airflow Happens
Your air conditioning system moves air in a continuous loop: return vents pull warm air in, the blower pushes it over the evaporator coil to cool it, and supply vents push the conditioned air back into your rooms. Anything that interrupts that loop — a blockage, a failing component, or a pressure imbalance — reduces airflow throughout the system.
The result: rooms that won’t cool, hot spots, and an AC that runs constantly but never feels powerful.
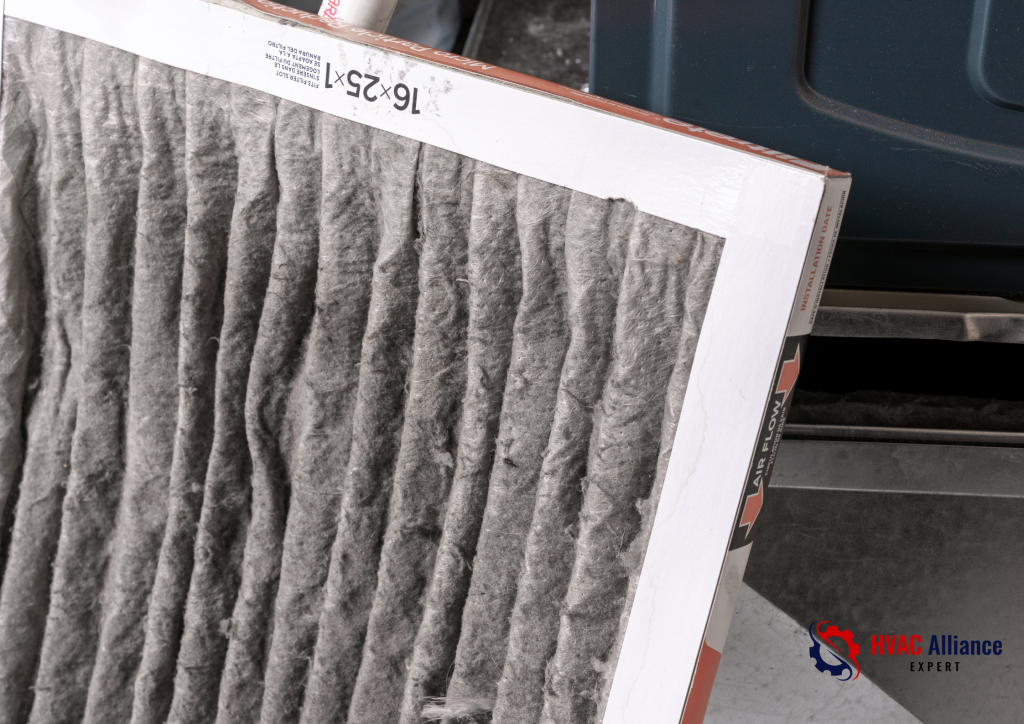
Step 1: Replace or Clean the Air Filter
This is the single most common cause of weak AC airflow, and it takes five minutes to fix.
A clogged air filter restricts the volume of air that can pass through the system. The blower motor has to work harder, the evaporator coil gets starved of airflow, and the whole system underperforms. In severe cases, a blocked filter can cause the coil to freeze over entirely — making airflow even worse.
How to check it: Pull the filter out (usually located at the return air grille or inside the air handler). Hold it up to the light. If you can’t see light through it, it needs replacing.
How often to change it: Every 30–90 days depending on filter type and household conditions. Homes with pets or allergy sufferers should change filters monthly.
What to buy: A MERV 8–11 rated filter balances good filtration with adequate airflow for most residential systems. Avoid very high MERV ratings (13+) unless your system is specifically designed for them — they can actually restrict airflow on standard units.
Step 2: Check All Supply and Return Vents
It sounds obvious, but blocked or closed vents are responsible for a surprising number of “weak airflow” complaints.
What to look for: Vents that have been closed off in unused rooms, furniture or rugs placed directly over floor vents, and supply registers clogged with dust buildup.
The common misconception: Many homeowners close vents in rooms they don’t use, thinking it saves energy. It doesn’t — it actually increases static pressure in the ductwork, strains the blower motor, and reduces overall system efficiency. All vents should remain open and unobstructed.
Quick fix: Open every vent in the house, vacuum out any visible dust from the register grilles, and move any furniture that’s sitting over floor vents.
Step 3: Inspect the Evaporator Coil for Ice
If your filter has been neglected or airflow has been restricted for a while, the evaporator coil — located inside the air handler — may have frozen over. A frozen coil blocks airflow almost completely.
Signs of a frozen coil: Dramatically reduced airflow from all vents, ice visible on the refrigerant lines near the air handler, water pooling around the unit as it thaws.
What to do: Turn the AC off but leave the fan running on “fan only” mode for 2–3 hours to allow the coil to thaw. Then replace the filter, open all vents, and restart the system. If it freezes again, there may be a refrigerant issue — call a technician.
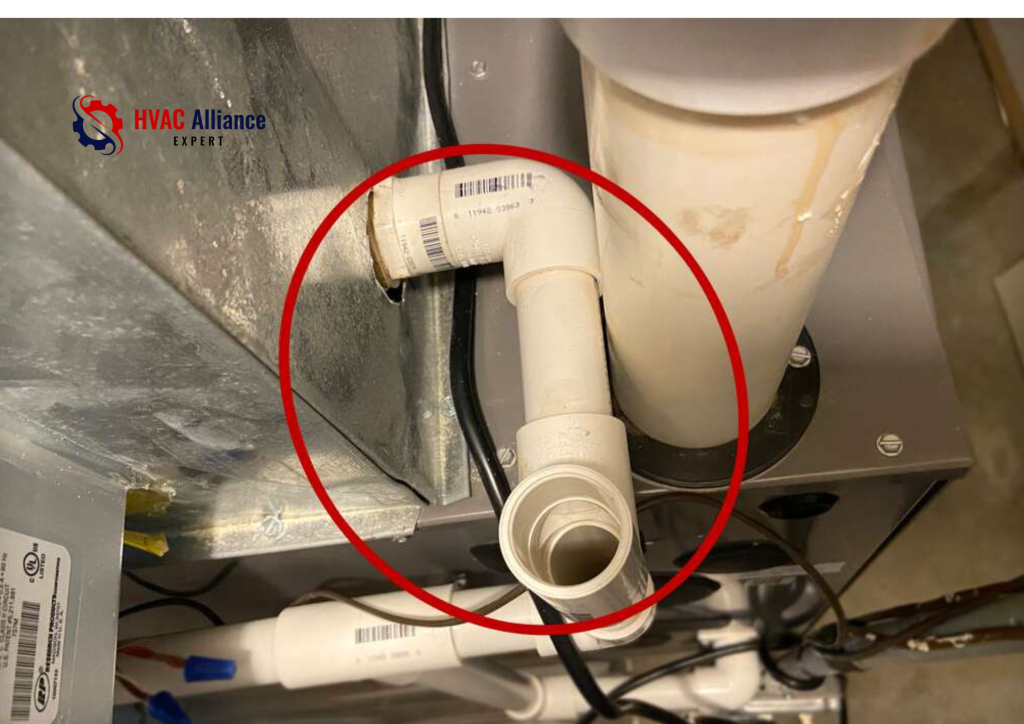
Step 4: Clear the Condensate Drain Line
A blocked condensate drain line doesn’t directly reduce airflow, but many modern AC systems have a safety float switch that shuts the system down — or reduces its operation — when the drain line backs up to prevent water damage.
Where to find it: A white PVC pipe, usually ¾ inch in diameter, that exits the air handler and drains outside or into a floor drain.
How to clear it: Pour a cup of distilled white vinegar into the drain line access port (usually a capped T-fitting near the air handler) every 1–3 months to prevent algae and mould buildup. For an already-blocked line, use a wet/dry vacuum at the outdoor drain exit to pull the clog free.
Step 5: Check the Ductwork for Leaks or Disconnections
Leaky or disconnected ducts dump conditioned air into your attic, walls, or crawlspace instead of your living areas. The result is weak airflow at the vents even when the system itself is working perfectly.
Signs of duct leaks: Rooms that are consistently harder to cool than others, unusually high energy bills, and excess dust accumulation near certain vents.
How to check accessible ducts: In your attic or basement, look for sections of flex duct that have pulled apart at the joints, or rigid duct with visible gaps at the seams. Feel for air blowing in areas where it shouldn’t be.
DIY fix: Reconnect any separated joints and seal duct seams with mastic sealant or metal-backed foil tape. Do not use standard duct tape — it dries out and fails within a year or two.
When to call a pro: If your ducts are mostly hidden in walls or ceilings, or if you suspect widespread leakage, a professional duct sealing service (including blower door testing) will find and fix every leak efficiently.
Step 6: Clean the Blower Wheel
The blower wheel (also called the squirrel cage fan) is the component inside the air handler that physically moves air through your system. Over years of use, dust and debris accumulate on the blower blades, reducing their ability to move air effectively — sometimes by 30–50%.
Signs of a dirty blower wheel: Reduced airflow despite a clean filter and open vents, a slight musty or dusty smell when the system runs, and a fan that sounds laboured.
How to access it: Turn off power to the air handler at the breaker. The blower assembly is typically accessible by removing a panel on the front or bottom of the air handler. The wheel slides or unbolts out in most units.
How to clean it: Use a stiff brush and a vacuum with a narrow attachment to clean between each blade. A dirty blower wheel is one of the most effective — and most overlooked — DIY maintenance tasks for restoring airflow.
Step 7: Test the Blower Motor
If cleaning the blower wheel doesn’t restore airflow, the motor driving it may be failing. A worn blower motor runs slower than it should, reducing the volume of air it can move.
Signs of a failing blower motor: Weak airflow that has gradually worsened over time, a humming or rattling noise from the air handler, the motor feeling excessively hot to the touch after running, or the system tripping the breaker.
How to test it: With the system running, check whether the blower is spinning at what feels like full speed. A motor capacitor failure is a very common cause of a slow-running blower — the capacitor is a small cylindrical component that gives the motor its starting boost. Capacitors are inexpensive (£10–£30) and a common DIY repair.
When to replace the motor: If the motor itself is burned out, replacement typically costs £150–£400 including labour. On an older system, this is worth weighing against the age and overall condition of the unit.
When to Call an HVAC Technician
Some causes of weak airflow — refrigerant leaks, a repeatedly freezing coil, failed blower motors, and widespread duct issues — require professional tools and qualifications to fix safely and correctly. If you’ve worked through all 7 steps and airflow is still weak, it’s time to call a certified HVAC technician for a full system diagnostic.
Annual maintenance visits also catch these problems before they affect performance, saving you money on energy bills and emergency repairs.
FAQs
The most likely causes are a severely clogged air filter, a frozen evaporator coil, or a failing blower motor or capacitor. Start by checking and replacing the filter — it solves the problem more often than any other fix. If airflow is still poor after a fresh filter, check for ice on the refrigerant lines near the air handler.
No — this is a very common myth. Closing vents increases static pressure inside the ductwork, which actually strains the blower motor and can cause the system to work less efficiently overall. Keep all vents open and unobstructed for the best airflow balance.
Common signs include a blower that hums but struggles to start, weak airflow despite a clean filter and open vents, or a motor that starts slowly and takes longer than usual to reach full speed. A multimeter can test capacitor health, or an HVAC technician can confirm it in minutes.
Room-specific weak airflow almost always points to a duct issue — either a disconnected flex duct section, a collapsed duct lining, or a duct that was undersized during installation. Check any accessible ductwork in your attic, basement, or crawlspace for the affected rooms first.
Once a year — ideally in spring before the cooling season begins. A professional tune-up includes cleaning the evaporator and condenser coils, checking the blower wheel, testing the capacitor and motor, inspecting the ductwork, and verifying refrigerant levels. It costs far less than an emergency repair call in the middle of summer.