
You set your thermostat to 72°F, but your home feels like 68° or 76°. You keep adjusting it up and down trying to find that sweet spot — and your HVAC system runs constantly trying to hit a number it never quite reaches. Sound familiar?
Your thermostat might be lying to you.
A miscalibrated thermostat is one of the most overlooked causes of home comfort problems and high energy bills. The good news is that testing and correcting it takes about 10 minutes, costs little to nothing, and can make an immediate difference in how your home feels — and how much you pay every month to heat and cool it.
This guide walks you through exactly how to do it.
Why Thermostats Go Out of Calibration
Thermostats don’t stay perfectly accurate forever. Several factors can cause them to read the wrong temperature over time:
- Age and sensor drift — The internal temperature sensor degrades gradually, reading higher or lower than the actual room temperature
- Dust and debris buildup — Dust inside the thermostat unit insulates the sensor and causes false readings
- Poor placement — A thermostat near a window, exterior wall, vent, or lamp absorbs heat or cold that has nothing to do with your actual room temperature
- Dead or weak batteries — Low battery power in digital thermostats causes erratic or inaccurate readings
- Recent HVAC work — Any work done on your system can sometimes jostle or affect thermostat calibration
- Extreme seasonal temperature swings — Repeated expansion and contraction of components can shift calibration over time
Even a thermostat that is only 2°F to 3°F off can cause your HVAC system to run noticeably longer cycles and add meaningfully to your monthly energy costs.
Step 1: Check the Basics First
Before touching the thermostat itself, rule out the simplest causes of inaccuracy.
Check the batteries. If your thermostat uses batteries, replace them now even if the display looks fine. Weak batteries are a surprisingly common cause of inaccurate readings and erratic behavior in digital thermostats. Fresh batteries take 30 seconds to swap and cost almost nothing.
Check the location. Stand back and look at where your thermostat is mounted. Ask yourself:
- Is it in direct sunlight at any point during the day?
- Is it near a supply vent blowing conditioned air directly at it?
- Is it on an exterior wall that gets cold in winter?
- Is it near a lamp, television, or any heat-generating appliance?
Any of these placement issues will cause your thermostat to read incorrectly no matter how well it’s calibrated. If placement is the problem, relocating the thermostat is the real fix — but the calibration steps below will still tell you how far off it currently is.
Step 2: Set Up Your Reference Thermometer
This is the heart of the calibration test. You need an independent, accurate temperature reading right at the thermostat’s location.
How to do it:
- Tape your glass bulb thermometer to the wall directly next to the thermostat — within 2–3 inches if possible
- Make sure the thermometer is not touching the wall surface itself, as the wall temperature can affect the reading
- Leave it in place for a full 15 minutes without opening doors, running appliances, or adjusting the HVAC system
- After 15 minutes, read the thermometer carefully and write down the temperature
This is your true room temperature reference.
Step 3: Compare the Two Readings
Now compare your glass thermometer reading to what your thermostat is currently displaying.
- Within 1°F: Your thermostat is reading accurately — calibration is not your issue
- 2°F to 3°F off: Minor calibration issue — worth correcting, especially if comfort or energy bills are a concern
- More than 3°F off: Significant calibration problem that is definitely affecting your comfort and energy costs
- More than 5°F off: Your thermostat sensor may be failing and replacement could be the better long-term solution
Write down the exact difference and whether your thermostat is reading high (warmer than actual) or low (cooler than actual). You’ll need this in the next step.
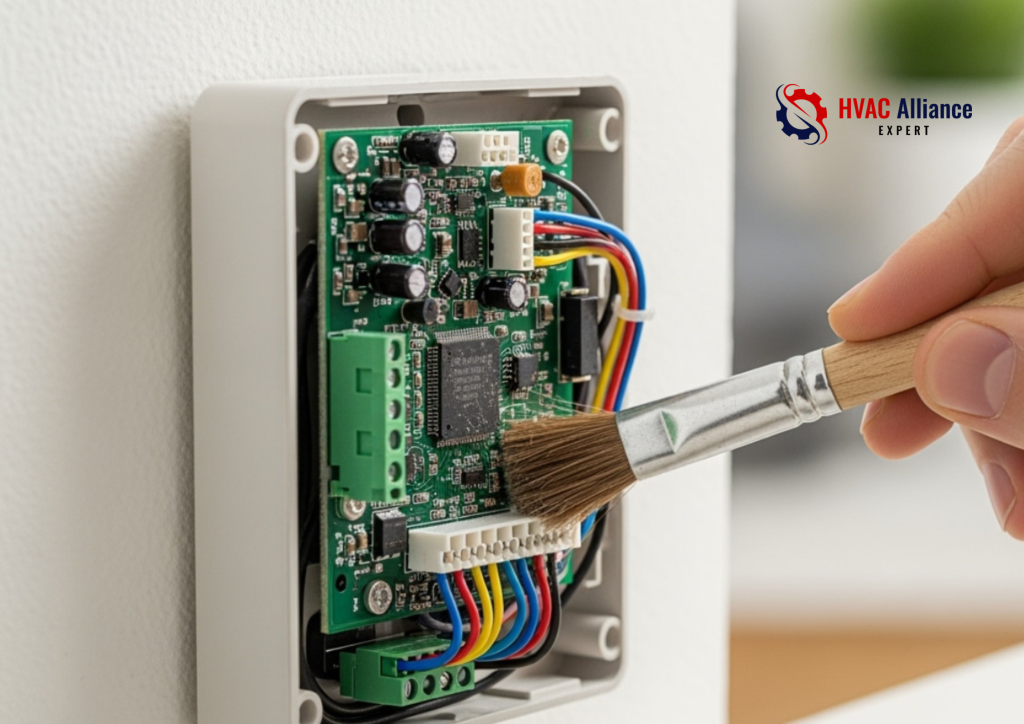
Step 4: Clean the Thermostat Interior
Before making any calibration adjustments, clean inside the thermostat. Dust buildup on the sensor is one of the most common causes of inaccurate readings — and cleaning it alone sometimes brings the thermostat back into accurate range without any further adjustment.
How to do it:
- Turn off your HVAC system at the thermostat
- Remove the thermostat cover — most snap off by pulling gently, others have one or two small screws
- Use a soft brush (a clean paintbrush works perfectly) or a short burst of compressed air to gently clean around the sensor and any internal components
- Do not touch the sensor directly or use any liquid cleaner inside the unit
- Replace the cover, turn the system back on, and wait 15 minutes before re-testing with your reference thermometer
Many homeowners are surprised to find this single step resolves a 1°F to 2°F inaccuracy entirely.
Step 5: Adjust the Calibration Setting
If cleaning didn’t fully resolve the gap, most thermostats — both older mechanical models and modern digital ones — have a built-in calibration adjustment.
For Older Mechanical/Analog Thermostats:
Look inside the thermostat cover for a small calibration screw or a bimetallic coil (a coiled metal strip that expands and contracts with temperature changes). This coil is the sensor. If it has visible dust or corrosion, clean it gently with a soft brush.
Some mechanical thermostats have a small calibration lever or screw near the coil that allows you to shift the reading up or down by a few degrees. Adjust it in small increments, wait 15 minutes, and recheck against your reference thermometer.
For Digital Programmable Thermostats:
Most digital thermostats include a calibration offset setting buried in the installer or advanced settings menu. This allows you to manually shift the displayed temperature up or down by a set number of degrees to match your actual room temperature.
How to access it:
- Check your thermostat’s manual for the exact steps — the process varies by brand and model
- Common brands like Honeywell, Ecobee, and Nest all include offset calibration options
- The setting is usually labeled “temperature offset,” “temperature correction,” or “calibration”
- Enter the difference you recorded in Step 3 (positive if your thermostat reads low, negative if it reads high)
After saving the setting, wait 15 minutes and compare against your reference thermometer again to confirm the adjustment worked.
Step 6: Verify and Fine-Tune
Run your reference thermometer test one final time after any adjustments:
- Leave the glass thermometer in place next to the thermostat for 15 minutes
- Compare the two readings again
- If they’re within 1°F of each other, your calibration is complete
- If there’s still a gap, repeat the offset adjustment in smaller increments until the readings align
This final verification step is what separates a proper calibration from a guess.
Thermostat Placement: The Hidden Accuracy Killer
Even a perfectly calibrated thermostat will give you problems if it’s in the wrong location. Ideal thermostat placement follows these rules:
- Interior wall — Away from exterior walls that conduct outdoor temperatures
- Central location — In a hallway or central living area that represents average home temperature
- Away from vents — At least 3–4 feet from any supply or return air vent
- Away from sunlight — Never on a wall that receives direct sun at any point during the day
- Away from heat sources — No lamps, televisions, ovens, or appliances nearby
- Consistent height — Between 52 and 60 inches from the floor, where occupied room temperature is most stable
If your thermostat is in a poor location, even perfect calibration will only partially solve your comfort issues. Relocating it to a better spot — a job most electricians or HVAC techs can do in under an hour — is often the most impactful fix of all.
Signs You Need to Replace Your Thermostat Instead of Calibrating It
Calibration fixes most thermostat accuracy problems, but sometimes the unit itself has reached the end of its life. Consider replacing your thermostat if:
- It’s more than 10 years old and consistently reads more than 3°F off
- The display is flickering, blank, or showing error codes
- The HVAC system short-cycles (turns on and off rapidly) regardless of settings
- Calibration adjustments don’t hold — the reading drifts back out of range within days
- The thermostat responds slowly or inconsistently to setting changes
- It uses mercury (older dial-type models) — these should be replaced for both accuracy and environmental safety reasons
A basic programmable replacement thermostat costs as little as $25 to $50. A smart thermostat like a Nest or Ecobee runs $150 to $250 but pays for itself quickly through energy savings and far more precise temperature control.
Conclusion
Your thermostat is the brain of your entire home comfort system. When it reads even a few degrees off, everything downstream suffers — your comfort, your HVAC system’s efficiency, and your monthly energy bill.
The good news is that testing and correcting thermostat calibration is one of the fastest, easiest, and most impactful maintenance tasks a homeowner can do. Ten minutes, a glass thermometer, and the steps in this guide are all it takes to know whether your thermostat is telling the truth — and to set things right if it isn’t.
A comfortable home shouldn’t be a guessing game. Now it doesn’t have to be.
FAQs
The clearest sign is that your home never feels as comfortable as your thermostat setting suggests it should be. Confirm it by taping a glass bulb thermometer next to the thermostat for 15 minutes and comparing the two readings. A difference of 2°F or more confirms a calibration issue.
No — your weather app shows outdoor temperature, not indoor room temperature. Always use a separate indoor thermometer placed directly next to your thermostat for an accurate comparison.
A quick accuracy check once a year — ideally at the start of heating and cooling seasons — is enough for most homes. If you notice sudden comfort changes or a spike in energy bills, check calibration immediately.
Yes, more than most people expect. Dust acts as an insulator around the temperature sensor, causing it to respond slowly and read inaccurately. A quick cleaning with a soft brush is always worth doing before making any calibration adjustments.
Yes. A faulty or poorly calibrated thermostat can send incorrect signals to your HVAC system, causing it to turn on and off in short, rapid cycles instead of completing normal heating or cooling runs. Short-cycling wastes energy and puts excessive wear on the system.